

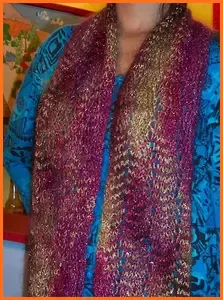
Accidental Cowl - There Is A Story Behind Every Cowl !
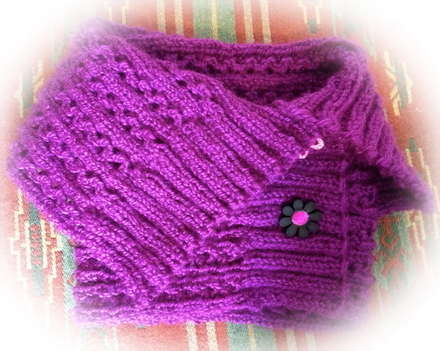
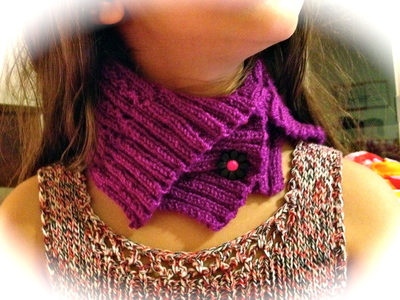
This cowl is not what I intended for it to be. It was suppose to be a blouse for my daughter. I started to work on the front section up to the armhole area. The piece got tug away for awhile because of my other projects. (I think you understand what I mean!) Then couple days ago, I went back to that piece to continue on. It turned out little bit smaller than I’d like it to be. I was sure that I measured and calculated my stitches pretty well. I have to blame it on my daughter on how fast she grows. Anyway, to make a story short, I figured a way to make use out of that piece I worked hard on it. I love the lace pattern and hate to throw it away. So, the “Accidental Crowl” was born as you can see.
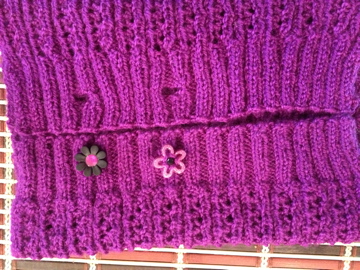
I added ribbing to another end and made a few button holes. My daughter picked her own unique buttons she bought during our trip to Vancouver. I think it turned out pretty well. She will need it when it gets colder during our walk to school.
Here is the Accidental Cowl Pattern
Materials
1. 1 ball of Carol simple soft light (3 oz/85g : 330 yds/301 m) - I used a little more than half of a ball for a child size.
2. Knitting needle US # 6 (4mm)
3. 2 buttons (⅞ - 1” in diameter)
4. Row counter
Stitch Pattern Information
2x2 Ribbing:
1st row (right side): *Knit 2, p 2; repeat from * to end of row.
2ne row (wrong side): Knit the knit st and purl the purl st.
Double Lace Rib Pattern (multiple of 6 +2)
1st row (right side): K2, *p1, yon, k2tog tbl, p1, k2; rep from * to end.
2nd row: P2, *k1, p2; rep from * to end.
3rd row: K2, *p1, k2tog, yfrn, p1, k2; rep from * to end.
4th row: As 2nd row.
Direction
CO 80 sts loosely. Work 2x2 ribbing for 2 inches. Work double lace rib pattern until desired length.
Then work 2x2 ribbing for 1 inch ending with the right side row. Then work button holes as follows;
Next row (wrong side): Work 14 sts of ribbing, bind off the next 3 sts, work 17 sts ribbing, bind off 3 sts, continue ribbing to end of row.
Next row (right side): Continue in ribbing to the first BO, CO 3 sts using single cast on method then work ribbing to the next BO, CO 3 sts and work to the end of row.
Continue with ribbing for another 1 inch. BO loosely.
Finishing
Lay piece flat with right side up. Fold each ribbing ends to the center. Attach buttons where appropriate on the side where there is no button holes.
Fold the top portion downward to show the right side when wearing. See photos above.
Knitting Abbreviations
yon = yarn over needle
k2tog tbl = knit 2 sts together at once through back loops
k2tog = knit 2 sts together at once
yfrn = yarn forward and around needle
Watch Instruction On How To Knit Double Lace Rib On My Youtube Video
Leave Accidental Cowl To Easy Knitting Pattern
Go To Free Scarf Knitting Patterns

You might like these
Feather and Fan Neck Scarf - Free Scarf Knitting Pattern
This Feather and Fan neck scarf is knitted with a 50 gram ball wool. Beautiful and make a great gift for your love one.
Lacy Zigzag Scarf - Easy To Knit And Beautiful Lace Scarf
Beautiful Lacy zigzag scarf free knitting pattern. This scarf knitted with luxurious Fiesta La Boheme in Starbust.
Free Scarf Knitting Patterns - Easy Scarf For Beginner
You can find easy and free scarf knitting patterns here. Many of them are designed by myself and many are from knitters around the web. Hope you enjoy them!


Recent Articles
-
pattern help, knitted rabbit!
May 31, 26 07:26 PM
This pattern for a toy rabbit ends previous row (back body) with 18 stitches, and instructs not to cut wool/leave on holder. This is the next instruction.


