

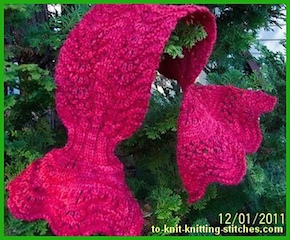
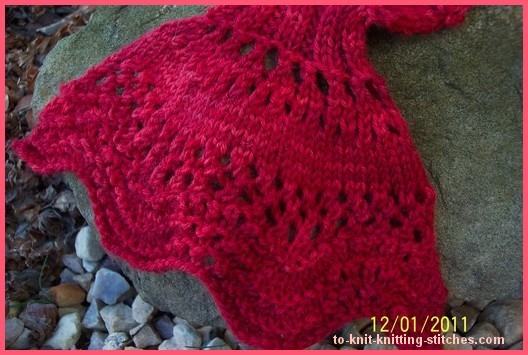
Rustic Neck Scarf In Feather And Fan Lace
I hope you all are having a nice and relaxing Summer. The whole world is going crazy in these past years and we're all stressed out for sure. Well, I know one thing that I think that us, knitters would agree which is knitting is helping to keep us sane for sure. It's a great way to relax and to nourish our souls for sure. Hope you'll try making this scarf. It's a fun Summer project since it's very small. Enjoy!
I had an extra ball of wool left over from making a Rustic Potato Chip Scarf. So, I thought it would be fun making up a new pattern for a small project like neck scarf which required only one ball of yarn. You can choose any yarn you like if wool irritated you. The yarn has to be at lease 131 yards. I used every bit of my wool. Buy extra ball of yarn if you want the scarf to be a little longer than 14 inches (that's just the body part around the neck).
This pattern is available in PDF Format. Click Here to Download
I choose Feather and Fan lace pattern for this neck scarf because I love the wavy beginning and ending parts of it. I'm sure many of knitters are pretty much familiar with feather and fan pattern.
Skill level: Intermediate
Measurement: width = 5 inches, body length 14 inch, total length = 22.5 inches
Gauge: 5.5 sts per inches on size #6 needle
Materials
- 1 ball of Dk light weigh yarn (50 gm/120m/131yds)
- A pair of knitting needle US # 6 (4 mm)
- 2 Stitch Holders
Direction for Feather and Fan Neck Scarf
Note: YF is "yarn in front" pretty much works the same way as yarn over.
CO 56 sts.
Row 1: Knit.
Row 2: Purl.
Row 3: K1, [k2tog] 3 times, [yf, k1] 6 times, *[k2tog] 6 times, [yf, k1] 6 times; repeat from * to the last 7 sts, [k2tog] 3 times, k1.
Row 4: Knit
Repeat Row 1 to 4 two more times.
Begin eyelet rows;
Row 1: K1, k2tog, * yf, k2tog; rep from * to the last st, yf, k1.
Row 2: Purl.
Row 3: K2, * yf, k2tog; rep from * to the end.
Row 4: Purl.
Begin decreasing rows;
Row 1: K2, * k2tog, k1; rep from * to the end. (38 sts)
Row 2: Purl.
Row 3: K2, * k2tog, k1; rep from * to the end. (26 sts)
Row 4: Knit.
Row 5 (Eyelet Row): K 1, * yf, k2tog; repeat from * to the last
st, k1.
Row 6: Purl.
Row 7: K1 * k2tog, k1; rep from * to the last st, k 1. (18 sts)
Row 8: Knit.
Begin 2x2 Ribbing;
Row 1: *K2, p2; rep from * to the last 2 sts, k2.
Row 2: Purl the purl stitches, knit the knit stitches.
Repeat Row 1 and 2 four more times.
Knit 2 rows.
Begin increasing row and feather and fan pattern as follow;
Row 1(right side): *K1, yf ; repeat from * to the last st, k1.(35 sts)
Row 2: Purl.
Row 3: Knit and increase 3 sts evenly. (total of 38 sts)
Row 4: Purl.
Row 5: K1,[k2tog] 3 times, [k1, yf] 6 times, [k2tog] 6 times, [k1, yf] 6 times, [k2tog] 3 times, k1.
Row 6: Knit.
Begin Body of the neck scarf in Feather and Fan pattern as follow;
Row 1: Knit.
Row 2: Purl
Row 3: K1, [k2tog] 3 times, [k1, yf] 6 times, [k2tog] 6 times, [k1, yf] 6 times, [k2tog] 3 times, k1.
Row 4: Knit.
Repeat row 1 to 4 for 17 more times. You can make it as long as you like on the body part. Just keep repeating this pattern.
Begin Making Keyhole Ribbing as follow;
Next row: Knit and decrease 2 sts evenly. (36 sts)
Next row: Purl one row.
Slip the 1st, 3rd, 5th, 7th, 9th, 11th, 13th, 15th, 17th, 19th, 21th, 23th, 25th, 27th, 29th, 31st, 33rd, 35th on to a stitch holder while placing the rest of the stitches (2rd, 4th, 6th,......and so forth) onto a needle. Now you should have 18 stitches on the holder and 18 stitches on the needle. Leave the stitch holder at the front of work. Start working with the stitches on your needle in ribbing.
Keyhole 2x2 ribbing pattern;
Row 1: K 2, p 2, to the last 2 sts, k2.
Row 2: K the k sts, p the p sts.
Repeat the row 1 and 2 four more times.
Slip all sts onto a stitch holder. Cut off yarn leaving 6 inches tail.
Slip the 18 stitches from the first holder to knitting needle and begin 2 x 2 ribbing as mention in the above (keyhole 2x2 ribbing pattern). Do not cut yarn when completed.
Next row: Knit the stitches off the needle and the holder at the same time. If you find it too difficult to knit both stitches at the same time, you can do the slipping method like this; While holding the non working needle (the one with the stitches on it) and the stitch holder in your left hand and with the working needle in your right hand, slip the 1st st from the needle and knit the 1st st off the holder then pass the slip st over the st just knitted.(skp). When completed you should now have 18 sts left on the needle and a key hold ribbing, yeah!
Knit one row.
Eyelet row 1(right side): K 2, yf, *k2tog, yf; rep from * to the last 2 sts, k 2. (19st)
Row 2: Purl.
Row 3: K 1, *yf, k1; rep from * to the end. (37 sts)
Row 4: P.
Row 5: K.
Row 6: P.
Row 7: K.
Row 8: P.
Row 9: K 2, *yf, k2tog; rep from * to last st, k1. (37 st)
Row 10: P.
Row 11: K1, *yf, k2tog; rep to end.
Row 12: P.
Row 13: Same as row 9.
Row 14: P.
Row 15: Knit and increase 19 sts evenly (56 sts total)
Row 16: K.
Begin Feather and Fan Pattern as follow;
Row 1: Knit.
Row 2: Purl.
Row 3: K1, [k2tog] 3 times, [yf, k1] 6 times, *[k2tog] 6 times, [yf, k1] 6 times; repeat from * to the last 7 sts, [k2tog] 3 times, k1.
Row 4: Knit
Repeat Row 1 to 4 two more times.
Bind off loosely. Cut off yarn and weave all the loose ends behind work. Block piece for a nice finish. Both ends should be straighten up after blocking. Then, send me a picture of you wearing the neck scarf you knit!
Note: Both ends will not be identical but will look pretty!
This pattern is available in PDF Format. Click Here to Download
Return From Neck Scarf To Easy Knitting Pattern
Return To Knitting Instructions Home Page

You might like these
Lacy Zigzag Scarf - Easy To Knit And Beautiful Lace Scarf
Beautiful Lacy zigzag scarf free knitting pattern. This scarf knitted with luxurious Fiesta La Boheme in Starbust.
Free Scarf Knitting Patterns - Easy Scarf For Beginner
You can find easy and free scarf knitting patterns here. Many of them are designed by myself and many are from knitters around the web. Hope you enjoy them!
Accidental Cowl - This Was Not Suppose To Happen!
Accidental cowl is a close-fit cowl in pretty lacy rib pattern. The size can be customized to fit your need.


Recent Articles
-
increasing in sleeve
Apr 11, 26 01:00 AM
the pattern says: inc 1 st at each end of foll 8TH ROW TILL 66 STS. cont in pattern till work measures 26cm. I have tried this 3 times and it does not


