

Mini Heart Pillow/Cushion Knitting Pattern With A Knit Along Video!
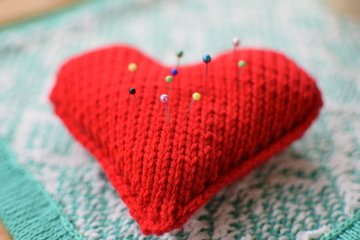
I missed putting this heart pillow/cushion pattern out before the Valentines Day this year. Oh, well there is always next year, right? I thought it would be fun to come up with a quick, fun and cute project to share with you. Today, I have for you a mini heart cushion/pillow that you can make for yourself or as a gift for this Valentine’s Day. You can use this cushion/pillow as a pin cushion, as a pillow for your kid’s stuffed animal, a dog and a cat toy or anything you can think of. You can probably finish knitting the heart pin cushion/pillow in a few hours or a day depending on your skills.
This project will let you explore and learn more about short row work without you even knowing it. I will guide you with a step by step detail for each row of the pattern. If you’re an experienced knitter you may find it too much details or too boring for you. Please bear with me because this is my way of writing so that anyone can learn to do this.
For this heart pillow/cushion project you will need a red yarn. I used worsted weight yarn on a number 5mm needle. You can experiment with other yarns with a suitable needle size if you like but your heart cushion may turn out with a slightly different in shape, e.g. wider or longer depending on the thickness of the yarn. You also will need a little bit of stuffing material. It can be a polymer stuffing or bits of scrap yarns or fabric. It won’t take much to fill this little heart. Another essential item you must have is a tapestry needle or big eye needle to seam booths sides close. If you’re skillful with crocheting, you can seam the edges with single crochet stitches. I have tried both techniques and I like the crochet edge better.
Supplies Need to Make This Heart Pillow
- Worsted weight red yarn of your choice (I’m not sure how much yarn I used but the whole pillow weighs 20g with the stuffing and all.)
- Knitting needle US #8 (5mm)
- Tapestry needle (big eye needle)
- Stuffing materials of your choice e.g. polymer, scrap yarns or scrap fabrics.
- Scissors

Direction For Making Mini Heart Pillow/Cushion
Cast on 2 sts.
Row 1 (Right Side): K2.
Row 2 (Wrong Side): P2.
Row 3 (RS): K1, m1, k to the end of the row.
Row 4 (WS): p1, m1, p to the end of the row.
Repeat row 3 and 4 until you have 24 sts on the needle.
Begin short rows as follows;
Row 1: k12, yf, sl 1, yb, turn.
Row 2; Sl 1, p10, (to last 2 sts), yb, sl1 yf, turn.
Row 3: Sl 1, k9 ( to a st before wrapped st), yf, sl1, yb, turn.
Row 4: Sl 1, p8, yb, sl1, yf, turn.
Row 5: sl1, k7, yf, sl1, yb, turn.
Row 6: sl1, p6, yb, sl1, yf, turn.
Row 7: Sl1, k6, k the next st and its wrap together, turn.
Row 8: Sl1, p6, p the next st and its wrap together, turn.
Row 9: Sl1, k 7 (to the wrapped st), knit the next st and its wrap together, turn.
Row 10: Sl1, p8 (to the wrapped st) p the next st and its wrap together and turn.
Row 11: Sl1, k 9, k the next st and its wrap together, turn.
Row 12: Sl1, p10, p the next st and its wrap together, p the last st.
Row 13: Sl1, k 21, yf, sl1, yb, turn.
Row 14: Sl1, p10, yb, sl1, yf, turn.
Row 15: Sl1, k9, yf, sl1, yb, turn
Row 16: Sl1, p8, yb, sl1, yf, turn
Row 17: Sl1, k7, yf, sl 1,yb, turn
Row 18: Sl1, p6, yb,sl1,yf, turn
Row 19: Sl1, k6, k the next st and its wrap together, turn.
Row 20: Sl1, p6, p the next st and its wrap together, turn.
Row 21: Sl1, k7, k the next st and its wrap together, turn
Row 22: Sl1 p8, p the next st and its wrap together ,turn.
Row 23: Sl1, k 9, k the next st and its wrap together, k the last st.
Row 24: Sl 1, p11, p the next st and its wrap together, p to the end of the row - 24 sts
Row 25: K1, k2tog, k to the end of the row.
Row 26: P1, p2tog, p to the end of the row.
Repeat row 25 and 26 until you have 2 sts left on the needle. Next row: sl 1, p1, psso, cut yarn about 20 inches and pass it through the last loop on the needle. Use a tail of yarn and a big eye needle to sew one side seam. Stuff it with the stuffing and seam another side closed. You can also use a crochet hook to join the seams together using single crochet stitches.
Optional: If you want to have eyelets on the edge like the pillow shows below here, you can substitute “yo” for “m1” on row 3 and 4.

Knitting Abbreviations and Knitting Terms
K = knit
P = Purl
K2tog = knit 2 sts together at once
P2tog = purl 2 sts together at once
Sl 1 = slip a st purlwise from the left needle to the right needle.
M1 = make one stitch by picking up a strain of yarn from a row below and knit into it. You can also pick up a stitch below the next stitch and knit into the back of it.
Yf = bring yarn to the front of work
Yb = bring yarn to the back of work
Turn = Turn work over. Your right needle will then become the left needle. You’ll work stitches off the left needle in the middle of a row.
Sl1,p1,psso = slip 1 st, p 1 st, pass the slipped stitch over the purl stitch
RS = right side
WS = wrong side
Let's Knit Together with This Heart Pillow Knit Along Video
Return to Knitting Instructions Home Page
See what's the latest post Here

You might like these
Knitting Machines - What is the best knitting machine to buy?
My guide and Ideas of what type of knitting machine you should considerate of buying.
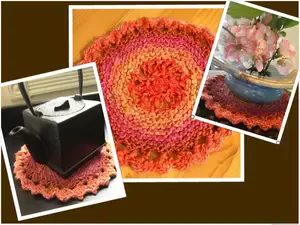
A Colorful All-Purpose Mat - A Quick One Skein Knitting Project.
This quick and easy all-purpose mat is knitted in rounds starting from the outer edge. The pretty little scallops along the edge look very much like crochet.
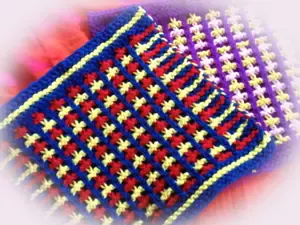
3-Color Pot Holders knitting pattern - jazz up To Your Kitchen!
These 3 color-pot holders knitting patterns are very pretty and useful in the kitchen. Each pad is knitted using 3 different yarns in a texture pattern.


Recent Articles
-
pattern help, knitted rabbit!
May 31, 26 07:26 PM
This pattern for a toy rabbit ends previous row (back body) with 18 stitches, and instructs not to cut wool/leave on holder. This is the next instruction.


