

Fantastic 3-Color Pot Holders - Wonder What Your Kitchen Will Say!
Description: 2 different looks of square pot holders with the same basic pattern using worsted weight yarn. The pattern requires a combination of 3 different colors of yarns to created a nice thickness and a unique look. The pad is thick enough to handle hot items without adding backing or lining. You're certainly can do whichever way you want.
Finished measurement: about 9 x 9 inches
Gauge: 4.5 st / inch ( not very important )
Skills level: Intermediate
These 3-color pot holders are perfect little projects for left over yarns. Find yarns with the same gauge to create a uniform look. Personally, I like to use darker yarn for the main part (background) in contrast to lighter accent colors. It makes the pattern pops out better.
I have two different ways of making the borders - one with multicolor and the other with one color. I love the look of the one-color border but it a little more difficult than the multicolor-border one.
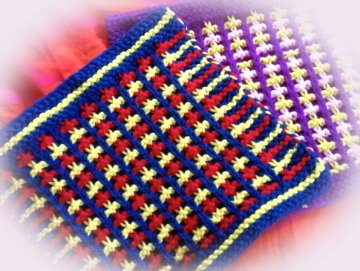
3 color-pot holders in vibrant yarns
Available in PDF Click Here To Download
Materials
1. Worsted weight yarns in color A, B and C (preferable wool due to fire resistant property). One 50 g ball will be plenty.
2. Knitting needle size 8 US (5mm)
3. Row counter
4. Stitch markers
3-Colors Ladders Pattern
Multiple of 4 sts + 3
Row 1 (right side): Using B k3, *sl 1, k3; rep from * to end.
Row 2: Using B k3, *yf, sl 1, yb, k3; rep from * to end.
Row 3: Using A k1, sl1, *K3, sl 1; rep from * to last st, k1.
Row 4: Using A p1, sl 1, *p3, sl 1; rep from * to last st, p1.
Row 5: Using C work as row 1.
Row 6: Using C work as row 2.
Row 7: As row 3.
Row 8: As row 4.
Repeat row 1-8.
Knitting Abbreviation
yf = bring yarn to the front of work
sl 1 = slip one
yb = bring yarn to the back of work
Pattern #1: Multicolor Border Pot Holder
CO 41 sts using A and knit 2 rows. Change to C and knit 2 rows. Change to A and knit 2 rows.
Work the pattern (3-Color Ladder Pattern) starting with row 1 while maintaining the garter st border as follow;
To create garter stitch border on each side of work, knit 3 sts before and after the 3-Color Ladder Pattern on each row. Place a stitch marker after the first 3 sts and before the last 3 sts as reminders. Using the same color of yarn as the pattern for each row.
Work until piece measures about an inch less than the width of the piece. Then k 2 rows with A, k 2 rows with C and k 2 rows with A. Bind off (knitwise) loosely.
If you wanted to add a little loop at one end of the pad, you can make an i-cord by;
Pick up 3 sts at the corner of the piece.
row 1: Sl 1, k2.
row 2: Sl 1, p2.
Repeat these 2 rows until desired length. BO and attach it to the same corner where the i-cord begins to make loop for hanging.
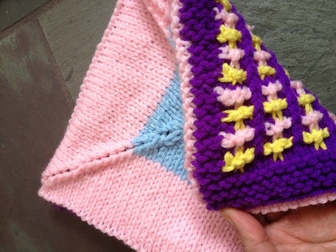
Pattern For One-Color Border Pot Holder

I think this one-color border pot holder is a little bit trickier than the other one because I had to keep my border in the same color and it involved twisting yarn to preventing the gaps.
Direction
CO 41 sts using A. K 6 rows.
Work 3 sts garter border (knit all rows) in color A before and after the pattern. Twist border yarn with other yarns every time when changing colors to prevent gaps. Use Stitch marker to mark the first and last 3 sts. You will need to attach yarn A (border yarn) on the left side border so that you have it available at all time.
Work the 3-color Ladder pattern stating with row 1 while keeping the borders in garter st pattern and in A. Work until piece is about an inch less than its width, then knit 6 rows in A. BO knitwise loosely.
Making a loop as the 1st pattern if preferred. Now you're done!
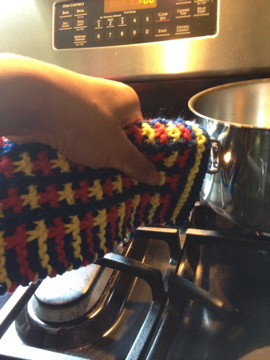
Double-Thick Pot Holder
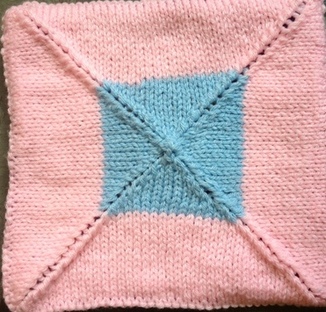
I was just curious how the pot holder would look and feel like with another plain knitted pad the other side. Well, now I know. It was very thick and it sure will great to handle any hot oven stuff.
This is just a free hand knitting, I made up the pattern as I knit. If you're interested you can try it out.
Direction (read before begin)
You'll need a set of 5 dpn (double pointed needles) US size # 8 (5mm) and worsted weight yarn.
With right side facing, pick up and knit 40 sts off each side of the finished square. You will now have 40sts each on needle #1,2,3 and 4. (160 sts total)
Start working in round starting from needle #1 through #4 as follows;
Rnd 1: Purl.
Rnd 2: Knit.
Rnd 3: Needle #1 K2tog, k to the last 2 sts of the needle, sl 1, k1, psso. Do the same with needle #2, #3 and #4.
Rep rnd 3 until there are 4 sts left. Cut yarn leaving 8 inches tail and thread it through these last 4 sts. Weave end behind work.
** note: If you find decreasing every row creates too much tension, you can add a knit row every once in awhile to ease it off. This depends on your knitting tension and yarn.
Knitting Abbreviation
sl = slip
psso = pass the slip st over
Return To Easy Knitting Pattern Page
Go To Knitting Instructions Home Page

You might like these
Knitting Machines - What is the best knitting machine to buy?
My guide and Ideas of what type of knitting machine you should considerate of buying.
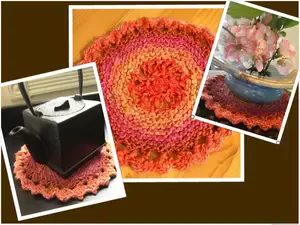
A Colorful All-Purpose Mat - A Quick One Skein Knitting Project.
This quick and easy all-purpose mat is knitted in rounds starting from the outer edge. The pretty little scallops along the edge look very much like crochet.
A Cute Heart Dishcloth Makes a Perfect Gift for Your Love One
Easy to knit heart dishcloth using 2 colors. The heart is sitting in the center and surrounded by seed stitch border.


Recent Articles
-
increasing in sleeve
Apr 11, 26 01:00 AM
the pattern says: inc 1 st at each end of foll 8TH ROW TILL 66 STS. cont in pattern till work measures 26cm. I have tried this 3 times and it does not


