Sirdar Jewelspun Jumper design 10140 - Raglan sleeve instruction

by Jo
(Hereford)

Hello - Just starting the raglan shaping.

Pattern is
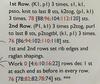
Row 1 (K1 P1) 3 times, s1,k1, psso, knit to last 8 sts, k2tog (p1 k1) 3 times
Row 2 (P1 k1) 3 times p2 tog, purl to last 8 sts, p2togbl, (k1 p1) 3 times.
1st and 2nd rows set rib edges and raglan shaping.
It’s the next instruction which is confusing me!
Work 6 rows dec 1 st at each end as before in every row.

Question - do I decrease the first stitch and then( k1,p1, k1, p1, k1, p1) or do I decrease the first sts and (p1,k1,p1,k1,p1)? I’m not really sure what they mean by ‘before” either?

Thanks for your help :)

Comments for Sirdar Jewelspun Jumper design 10140 - Raglan sleeve instruction

Average Rating starstarstarstarstar

Click here to add your own comments

Oct 09, 2023
Rating
starstarstarstarstar
Sirdar 10140 sleeve raglan
by: Anonymous

Hi,
Can someone help please? The pattern says 'Work 12 rows dec 1 st at each end as before in next and every foll 4th row'. The 2 rows previous are:
Row 1 - K1, s1, k1, psso, knit to last 3 sts, k2tog, k1.
Row 2 - Purl.
For the next row I followed the instructions on Row 1.
I think I purl the next one.
Should the next rows be plain and purl until I get 4th row and follow the instructions for Row 1 again.
Hope this makes sense.
Thanks

-----

You work straight without decreasing 1 more row after row 1 and 2. (so that's 3 rows) Then on the next row which is the right side and the forth row, you repeat row 1 for the next dec row. Keep doing it like that until required length or stitches.

Ratcha


Dec 20, 2022
Rating
starstarstarstarstar
Help needed with raglan shaping please
by: Melanie

I am doing the first size for the jumper but I think I have made a mistake and will have to start again 😕. I understand the first and second rows of the pattern that sets rib edges and raglan shape, but I've done those two rows for 37 rows as stated. instead should i have done 1sr row in rib pattern and then purled a plain row (meaning no decreases in the purl row) and then repeated the first decrease row etc? I hope this makes sense.

Jan 24, 2022
Rating
starstarstarstarstar
so glad you figured it out!
by: Ratchadawan

Hi Helen,

I just saw you post today and I'm so glad you've got that figured out.

Happy knitting!

Ratcha

Jan 22, 2022
Rating
starstarstarstarstar
10140 neckband
by: Helen H

Have worked it out now! Phew!

Jan 22, 2022
Rating
starstarstarstarstar
Neckband of 10140
by: Helen H

Help! I’m knitting this and am a beginner! I’m stuck on the neckband
I don’t get the pattern
I’ve got 4 lots of stitches on stitch holders but suddenly it talks about stitches on left and right side of neck? What are these? I’ve checked and am sure I’ve knitted correctly to this point
I’m knitting the second size so I should have 16 on stitch holder for each sleeve, 24 for front of neck on stitch holder and 36 for back of neck on stitch holder but I’m missing
15 stitches sling left side of neck and 15 stitches along right side of neck
Don’t know how to proceed!

May 14, 2021
Rating
starstarstarstarstar
Sirdar Raglan decrease question
by: Jo

Thank you so much for your reply and help - now it makes sense :)


-----

You're welcome! Jo.


Ratcha


May 13, 2021
Rating
starstarstarstarstar
Raglan sleeve shaping
by: Ratchadawan

Hi Jo,

For the next 6 rows, you will repeat row 1 and 2. These two rows are set up rows and there are already have decreases in them. Just keep doing row 1,2,1,2,1,2 and then continue with the rest of the pattern. You started out with 94 sts and ended up with 94-12 = 82 sts, just like the pattern states.

Thank you for the question and visiting. Have fun knitting!

Ratcha


Photo Source: Sirdar Jewelspun Jumper design 10140

Click here to add your own comments

Join in and write your own comment! It's easy to do. How? Simply click here to return to Knitting Questions And Comments.

spring banner

ILoveYarn20
notesheetpackage2


Enjoy this page? Please pay it forward. Here's how...

Would you prefer to share this page with others by linking to it?

  1. Click on the HTML link code below.
  2. Copy and paste it, adding a note of your own, into your blog, a Web page, forums, a blog comment, your Facebook account, or anywhere that someone would find this page valuable.