

Elegant Eyelet Cowl/Scarf
|
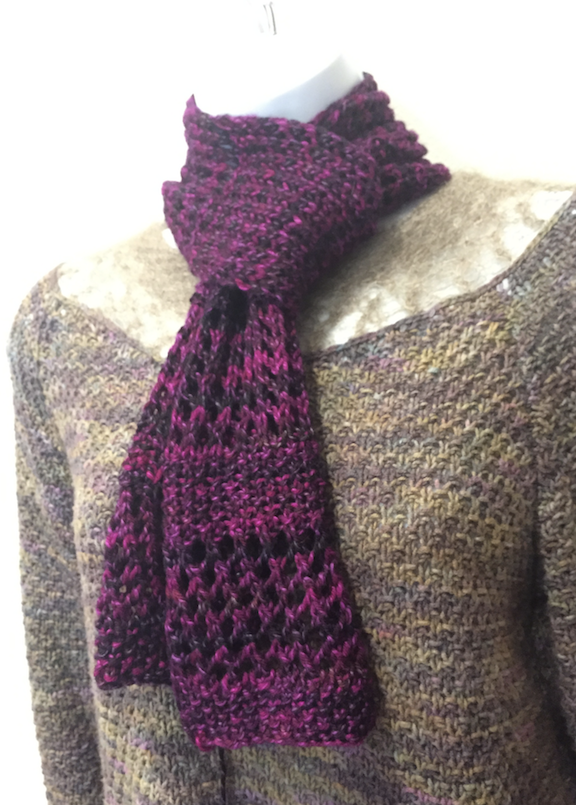
This is a very quick to knit Cowl (or leave it as a long scarf) I made for my friend as a Christmas present this year. I use bigger needles than suggested by a label on the yarn, so it knitted up quite fast. I adore the way this merino/silk wool looks and it feels very soft. When I first saw the yarn at a yarn shop in Port Townsend, Washington, I knew that my friend would love it because she is crazy about purple (and so do I). |
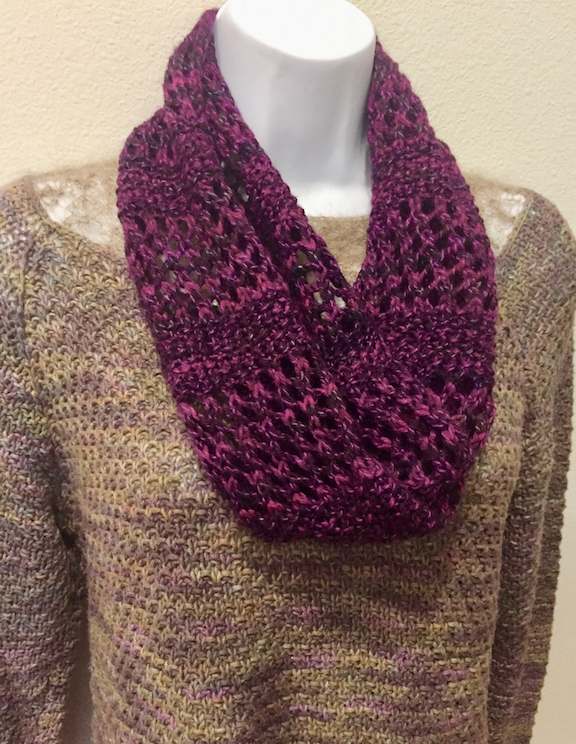
This cowl is a perfect project for beginners who get tired of just plain knit and purl stitches because there are more interesting stitches added to it. It gives you a chance to practice a lot of YO, K2tog, and SKP sts.
Gauge: Not that important but I’ve got about 4 sts per inch on size 5.5 mm needle (US #9) over seed st.
You can view and print this cowl pattern at google doc Here.
Materials
1. 1 ball (100 gm/240 yards) of DK or Worsted Weight yarn of your choice. I used 85% Merino wool and 15% silk by MOUNTAIN COLORS inc called “Twizzle” in honey plum color. It’s a DK weight yarn. (I love buying yarns from Crafty when possible because there’re always yarns on sale and beautiful yarn. Here is my affiliate link to DK yarns at Craftsy. )
2. One pair of straight needles or circular needles size 4.5 mm (US #7)
3. One pair of straight needles or circular needles size 5.5 mm (US #9)
4. A row counter
5. Pins to pin down the scarf when blocking (if you want to block the scarf)
6. 2 Stitch holders (optional)
7. Tapestry needle
Note: If you’re planning to make a long scarf instead of a cowl then you don’t need to get #6 and #7.
Direction
The stitch patterns below are the makes up of this scarf. Use each stitch pattern as directed.
DO NOT START KNITTING YET
Seed Stitch Pattern
Row 1 (right side) : Sl 1 purlwise, *p1, k1; repeat from * to end of row.
Row 2 (wrong side) : Same as row 1.
Repeat row 1 and 2.
Right Slanted Eyelet Pattern
Row 1 (right side): Sl 1 purlwise, k1, *yo, k2tog; repeat from * to last st, k1.
Row 2 (wrong side): Sl 1 purlwise, p to last st, k1.
Repeat row 1 and 2.
Left Slanted Eyelet Pattern
Row 1 (right side): Sl 1 purlwise, *SKP, yo; repeat from * to last 2 sts, k2.
Row 2 (wrong side): Sl1 purlwise, p to last st, k1.
Repeat row 1 and 2.
Fisherman Rib Stitch Pattern
Row 1 (right side): Sl 1 purlwise, *K1B, k1; repeat from * to last st, k1.
Row 2 (wrong side): Repeat row 1.
Repeat row 1 and 2.
Notes and Knitting Abbreviations
Sl 1 purl wise, is to slip a stitch purl wise. This means to insert a needle directly into a loop pointing upward, just as you do in purl st . Notice every row starts out a slip st and ends with a knit st. This is to help make borders look neat.
Slip 1 knit wise is to slip a stitch off left hand needle by pointing right needle down through the next st.
YO is a yarn over st. You can do this by bringing yarn into front of work and work the next st with yarn over the right needle (if you’re right handed).
K2tog is to knit 2 sts together at once
SKP is slip, knit, passover. Do this by slipping the next st knit wise on to right needle, then knit the next st and pass the slipped st over the stitch just knitted.
K1B is to knit a st below the next st. Do this by inserting a needle into a st directly below the next st and knit into it, then slip it off the needle.
M1 (Make 1) is to make 1 st, by either k1 into front and back of a loop or lift up horizontal strain of yarn and knit into it. (see https://www.to-knit-knitting-stitches.com/increase-knitting.html)
Now you can begin knitting!
Cast on 21 sts loosely with larger needle. Leave about 2 feet of yarn at the beginning for seaming later on.
**Make seed stitch pattern for 10 rows ending with a wrong side row.
Make right slanted eyelet pattern for 12 rows ending with a wrong side row.
Make seed stitch pattern for 10 rows ending with a wrong side row.
Make left slanted eyelet pattern for 12 rows.
Repeat from ** 2 more times ending with a wrong side row.
Next row: Sl 1 purlwise, p to last 3 sts, p2tog, K1. (20 sts total)
Next row: Sl 1 purlwise, p to last st, k1.
Change to smaller size needle
Make Fisherman rib (this is going to be a center part) for about 4 inches ending with a wrong side row.
Next row: Sl 1 purlwise, k1, M1, k to end of row. (21sts total)
Next row: Sl 1 purlwise, k to end of row.
***Make right slanted eyelet pattern for 12 rows ending with a wrong side.
Make seed stitch pattern for 10 rows ending with a wrong side.
Make left slanted eyelet pattern for 12 rows; Repeat from *** 2 more times ending with a wrong side row.
Make seed stitch pattern for 10 rows ending with a wrong side.
Bind off all sts loosely. Leave about 1.5-2 feet of yarn before cutting it for sewing later on.
Blocking (optional)
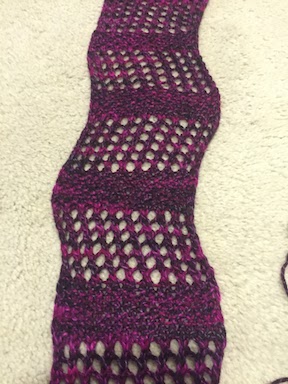
Wet the scarf with a cold water. Squeeze gently to get most of the water out. Lay it on top of a dry towel and roll the towel with the scarf in it to dry off excess water. Lay scarf on another dry towel and carefully shape the scarf in to zigzag pattern as shown below. Smooth it out with your hand. Use pins to secure the scarf with the towel. Let the scarf dry over night.
Try not to stretch the rib area to much.
Finishing
If instruction below sounds too complicated, then you can go my Joining Ends Of Scarf Video to see how to do it. (see video below)
Hold the scarf in your palm with right side up. Bring the right end of scarf to the left end of the rib pattern and hold them together with a stitch holder. Bring the left side end of the scarf to the right end of the rib pattern and hold them together with another stitch holder. Bind each ends to the ends of rib pattern with the left over yarn. Trim excess yarn off and you’re done.
You can find video tutorials related to this Eyelet Cowl below;
How to knit “YO, K2TOG” https://www.youtube.com/watch?v=bYMQvGAluBg
How to knit “SKP” https://www.youtube.com/watch?v=NHOuaMc7alU
How to “K1B” https://www.youtube.com/watch?v=aNcr9PQWAVs
How to “M1 by picking up horizontal loop”
https://www.youtube.com/watch?v=MKR6yBVK0E4
and “M1 Knit into front and back of a stitch”
https://www.youtube.com/watch?v=tSieOh_j46U
How To “Slip 1 Purlwise & Slip 1 Knitwise” https://youtu.be/0LKjjiSzkRk
You can view and print this cowl pattern at google doc Here.


Recent Articles
-
increasing in sleeve
Apr 11, 26 01:00 AM
the pattern says: inc 1 st at each end of foll 8TH ROW TILL 66 STS. cont in pattern till work measures 26cm. I have tried this 3 times and it does not


