

Cable Knit - Adding Exciting Dimensions To Your Projects!
I've always enjoy working with cable knitting. It gives me something to look forward to instead of doing plain knit and purl. I love seeing the end result of it.
It's such an amazing thing to see how cable knitting can create beautiful depths and dimensions that bring knitting to life.
Before you get started, you'll need a cable needle for this. You can also use double pointed needle as a substitute for cable needle as well.
There are so many patterns of cable knit and I don't even know what to pick. I'm using 4 stitch-cable and 9-stitch-plait (shown below) as examples here so that you can see and get an idea of how cable stitches are made.
Other cable patterns you can find here are Oxo Ripple Panel, Celtic Plait Panel and 6-stitch Plait I used for the school vest.
I will gradually add more cable panels in my knitting stitch patterns page. So don't forget to check often to see more cable panel patterns.
Here Is An Example Of How To Knit 10 Sts-Cable
How to knit 4-stitch CABLE with LEFT stitches crossing over RIGHT stitches.
|
This image shows an example of 4-sts cable knit. In this cable pattern, the cables are form on row 3 and 5, therefore create short and long twists. |

Direction for 4 sts-cable with left crossing
Begin with Casting on 14 stitches.
Row 1 (Right Side): P 5, K4, P5
Row 2 (Wrong Side): K5, P4, K5
Row 3 : P5, K4, P5
Row 4 : K5, P4, K5
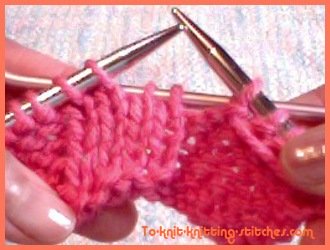 This image shows holding 2 sts at back of work with a cable needle. |
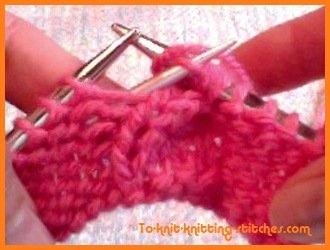 This image shows knitting a stitch from left needle before knitting off the cable needle. |
Row 5: P 5, Slip 2 sts onto cable needle and leave it at BACK of work, K 2 sts from left needle, K 2 sts from cable needle, P 5 (see image 1 and 2)
Row 6: K5, P4, K5
Repeat row 1- 6 to form a long ribbing pattern. Binding off on the right side.
How to knit 4-stitch CABLE with RIGHT stitches crossing over LEFT stitches.
Follow the instruction for 4-sts cable pattern above except row 5. Change Row 5 to P5, slip 2 st onto cable needle and leave it at FRONT of work, K 2 from left needle, K2 from the cable needle. See pictures below;
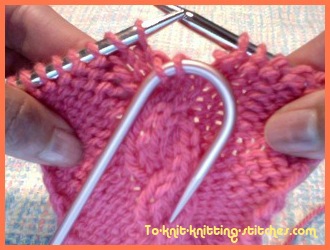 This image shows cable needle holing 2 non working sts at front of work. |
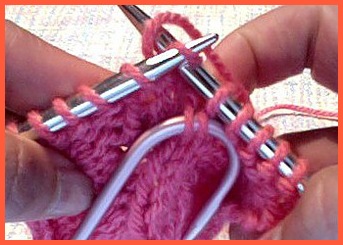 This image shows knitting st off left needle while skipping the 2 sts on the cable needle. |
You'll have 2 right sts crossing over 2 left sts cable knit as and end result (see picture below).


Here is an example of bobble cable headband I knitted. You can get this pattern at Bobble Cable Headband.
Practice Exercise
Make a cable headband using bobble cable pattern above. Knit an inch less
than head circumference then binding off all stitches. Leaving 10
inches yarn behind for sewing. Sew two ends together using tapestry needle. Weave the end of yarn behind stitches.
How To Knit 9-sts Plait Cable
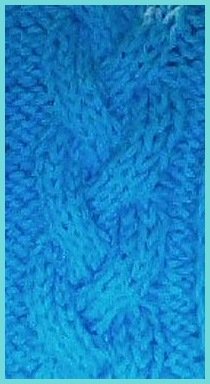 |
This image shows a downward 9 stitch plait Directions Note: Cable knit works best with a purled background. When knitting cable on knitted background, purl a few stitches before begin the cable. Downwards 9-stitch Plait Row 1(right side): knit. Row 2 and every alt row: Purl. Row 3: C6F, k3. Row 5: Knit. Row 7: K3, C6F. Row 8: Purl. Repeat these 8 rows to form a long plait. |
Upwards Plait
Row 1 (right side): Knit.
Row 2 and every alt row: Purl.
Row 3: C6B, k3.
Row 5: Knit.
Row 7: K3, C6F.
Row 8: Purl.
Repeat these 8 rows to form a long plait.
Knitting Abbreviations Used In 9-stitch-plait
K = knit
P = purl
alt = alternate
C6F = Cable 6 Front (Slip next 3 sts. onto a cable needle and leave them at the front of work. Knit next 3 stitches from the left-hand needle and then knit the 3 stitches off the cable needle.)
6CB = Cable 6 Back (Do the same as C6F but leave next 3 stitches on a cable needle at the back of work.
Leave Cable Knitting To Knitting Stitches
Go to Knitting Stitch Patterns Page


Recent Articles
-
increasing in sleeve
Apr 11, 26 01:00 AM
the pattern says: inc 1 st at each end of foll 8TH ROW TILL 66 STS. cont in pattern till work measures 26cm. I have tried this 3 times and it does not


