banner-mom

Attaching a band

by Susan
(Sydney, NS)

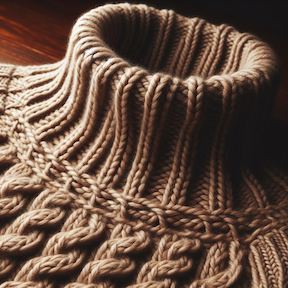
rib neck band (not related to the question)

rib neck band (not related to the question)

Pattern states: neckband - work ribbing for 3 cm, then knit 1 row (rt side) & work several rows in st st of a different Color.
Sew neckband matching sets & using backstitch on right side of work.

Not sure how to do this

Comments for Attaching a band

Average Rating starstarstarstarstar

Click here to add your own comments

Feb 04, 2024
Rating
starstarstarstarstar
attaching a band
by: Ratchadawan

Hi Susan,

From what I see is you work the ribbing for 3cm, then knit 1 row on the right side. Work stockinette st for several rows in different color. (I wonder why it's not specify #or rows). I am breaking the instruction down for you.

Neckband with Ribbing:
Cast On:
Begin by casting on or pick up the required number of stitches for your neckband. If the pattern specifies a ribbing of 3 cm, you'll work this in ribbing pattern.

Ribbing:
Work in the ribbing pattern (for example, knit 2, purl 2) for 3 cm. This creates the ribbed texture.

Knit 1 Row (Right Side):
After completing the ribbing, knit one row on the right side of the work. This sets up the transition to the stockinette stitch section.
Stockinette Stitch Section in a Different Color:

Change Yarn Color:
Switch to the new color yarn that you want to use for the stockinette stitch section.

Stockinette Stitch Rows:
Knit every stitch for several rows to create the stockinette stitch section. The number of rows will depend on your pattern and desired length.

Sewing the Neckband:
Fold in Half:
Fold the neckband in half along its length, wrong sides together.
Aligning Sets:
Match the sets of stitches on both sides of the neckband, making sure the ribbing lines up correctly.

Backstitch:
Use a backstitch to sew the neckband together. The backstitch is a strong stitch and will create a secure seam.

Finish:
After sewing the neckband, weave in any loose yarn ends and ensure that the seam is secure and tidy.

I hope this makes sense.

Ratcha

Click here to add your own comments

Join in and write your own comment! It's easy to do. How? Simply click here to return to Knitting Questions And Comments.

spring banner

ILoveYarn20
notesheetpackage2


Enjoy this page? Please pay it forward. Here's how...

Would you prefer to share this page with others by linking to it?

  1. Click on the HTML link code below.
  2. Copy and paste it, adding a note of your own, into your blog, a Web page, forums, a blog comment, your Facebook account, or anywhere that someone would find this page valuable.