

Lunar Azul - Warm Yourself Up This Winter With This Extra Comfy Wooly Scarf
I went shopping at Joann's Fabric one day and spotted this roving yarn by Patons. So, I grabbed a few and thought about using it to make little accessories like flowers and things and then felt it. Of cause I did not stick with the plan. I turned this bulky wool into a reversible neckwear. I normally don’t knit with bulky yarn much, but I have to admit that I actually enjoy this one. I love gliding my fingers over the piece to feel the softness and texture of the yarn and stretching out ribbing just to see how far it can go.
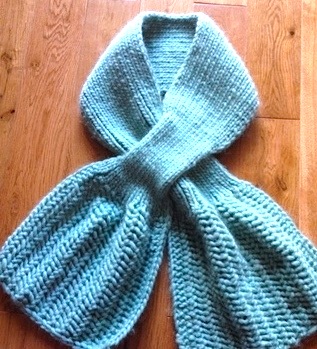
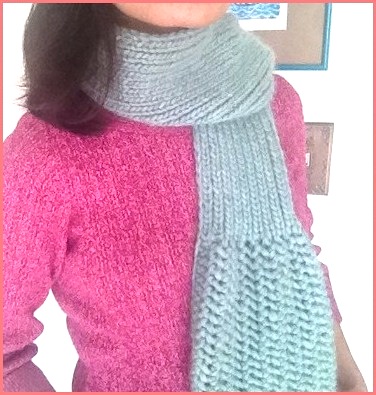
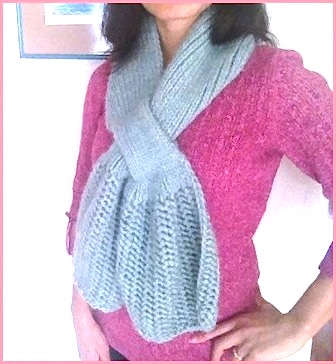
The scarf looks like a giant bow tie. Both ends have a simple lace design which looks almost like crochet. The scarf body part that wrap around the neck is worked in a simple 1x1 ribbing. I decided to add a keyhole because I want my scarf to stay better around my neck without slipping off all the time. Some people may not like keyhole and can just leave off this part.
I did slip stitch along both edges to keep it nice and neat. I did this by slip the first stitch purlwise and knit the last stitch on every row.
Here Is The Pattern For The Scarf
This Pattern Is Available in A PDF Format.
Click Here To See Or Download Lunar Azul Scarf.
Finished Measurement: Length = 50 inches from end to end. Width at the lace part = 11.5 inches. Width at ribbing part = 5.75 inches at rest
Gauge: 15 sts /4 inches over stockinette sts on 6.5mm needle (size US #10.5)
Materials
1. 2 balls of Roving by Patons Classic Wool (120 yds each) or Bulky yarn of your choice (total of 240 yards).
2. Knitting needle Size US # 10.5 (6.5mm)
3. 2 Stitch holders
4. Tapestry needle to weave loose ends.
Direction
Loosely CO 30 sts. Begin working Purse Stitch Lace as follows;
Row 1: P 2, *yrn, p2tog; rep from * to last 2 sts, p1, k1.
Row 2: Sl 1 purlwise, p1, *yrn, p2tog; rep from * to last 2 sts, p1, k1.
Rep row 2 until piece is about 9 inches.
Then begin 1x1 ribbing as follow;
Row 1: Sl 1 purlwise, k1, *p1, k1; rep from * to end.
Rep row 1 until ribbing part is long enough to go around your neck comfortable. I make my ribbing a little long. measurement (without the lacy part) is about 26 inches. Use your own judgement and make it the way you like. Now we’re going to make the keyhole. If you don’t want the keyhole, you can skip this part and continue ribbing for another 25 rows.
Keyhole
Note: It may look hard but it isn’t. I just explained it in a very details. That’s why it’s a little long.
Slip the 1st stitch (purled st) on to knitting needle. Slip the 2nd stitch (knitted st) on to stitch holder. Now take turn slip the purled sts onto the knitting needle and slip the knitted sts onto the stitch holder until the end of row. Now you have just evenly separated the knitted and purled sts apart.
Begin working with the stitches on the needle first. If you’re using straight needle, you have to slip all these sts onto an empty needle in order to get to the working yarn.
Now that you have all the sts on the needle that is pointing to the right direction, you can now work them in stockinette stitch (purl one row, knit one row alternately). Don’t forget to slip the 1st stitch. Work stockinette st for 25 rows, then put them on a stitch holder.
Transfer sts from the holder to knitting needle and work 25 rows of stockinette st.
Closing the keyhole
Carefully transfer all of the 30 sts from holders back onto knitting needle in the same order of ribbing. Place the purled st of the back panel onto the needle first and then the knitted st of the front panel second. Alternately placing sts onto the needle until completing the row.
Next row: Sl1, k1, *p1, k1; rep from * to end of row.
Rep this row for 1 inch.
Now do the last part of the lacy end as follow;
Row 1: Sl 1, p1, *yrn, p2tog; rep from * to last 2 sts, p1, k1.
Repeat row 1 until the lacy part is about 9 inches. Bind off using stretchy method.(see video below or at; https://www.youtube.com/watch?v=DCh2StCxnyQ&list=UUvGGCSq9yvDG6zessFXqX-Q&feature=share)
Weave all loose ends behind work and block piece if needed.
Well that a lot of information, I know. I hope I didn't miss anything. Enjoy!
Helpful Tutorial Videos For This Pattern
How To Knit Purse Stitch Lace
How To Knit Stretchy Bind Off
Knitting Abbreviations
CO = cast on
P = purl
K = knit
Sl = slip
yrn = yarn round needle (wrap yarn around needle once). Make 1 increase.
p2tog = purl 2 sts together at the same time. Make one decrease.
rep = repeat
*_* = repeat direction between the two *.


Recent Articles
-
pattern help, knitted rabbit!
May 31, 26 07:26 PM
This pattern for a toy rabbit ends previous row (back body) with 18 stitches, and instructs not to cut wool/leave on holder. This is the next instruction.


