
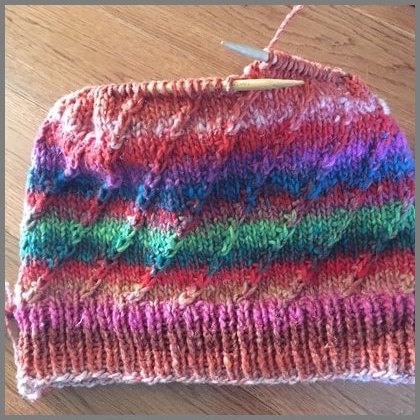
Do A Little Twist Slouchy Hat - Free Easy Hat Knitting Pattern
You can view and print this pattern in Google Doc at;
Description: An adult hat knitted in a circle using worsted weight yarn (I used Noro yarn and I found that it makes a slouchy hat looks a little stiff or perhaps I didn’t make a hat long enough. I think if you use a softer wool, it might give a better result). The hat started out with ribbing and work upward to the crown. You can pick 1x1 or 2x2 ribbing. It’s totally up to you. And you can make a hat as long as you want. The longer you knit, the slouchier it will get. This hat is quite simple to knit because it’s only using pretty much just knit sts alternating with right twist stitches or C2F (Cross 2 Front). Nevertheless, be careful don’t get too comfortable. Pay close attention where the twist stitches are, so that you will have them line up evenly.

Skills: Easy, beginner can do it. Watch A Video If you need help with the C2F
Stitches Used: knit, k2tog, C2F, Ribbing
Gauge: 4sts/6rows/inch over 5mm(US #8 needle)
Finished size: Fit loosely for 22 inches adult head. To down size this hat decrease by a set of 6 sts.
Materials
- 100g of worsted weight yarn of your choice
- 16” Circular knitting needle US size 6 (4mm)
- 16” Circular knitting needle US size 8 (5mm)
- One set of size US# 8 Double Pointed Needles (8 inches are easier to handle than the longer one)
- A stitch marker
- Tapestry needle
Direction
Using small circular needle, CO 96 sts and join them in round. Knit k1p1 ribbing or k2p2 ribbing for 1 ½ - 2 inches. (make sure you have multiple of 4 sts if you do k2p2 ribbing). Change to larger circular needle and begin pattern chart 1 for hat body starting with rnd 1.
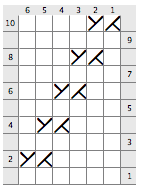 |
Pattern Chart 1: Right Twist For Hat Body Rnd 1: Knit. Rnd 2: *K4, C2F; rep to end of rnd. Place a stitch marker at the beginning of a round. Rnd 3 and every alternate rnd: Knit. Rnd 4: *K3, C2F, k1; rep to end of rnd. Rnd 6: *K2, C2F, k2; rep to end of rnd. Rnd 8: *K1, C2F, k3; rep to end of rnd. |
Rnd 10: *C2F, k4; rep to end of rnd.
Rnd 11: Remove stitch marker, k1, Place stitch marker marker, k to end of rnd.
Repeat rnd 2-11 twice more. Then begin decrease a crown of a hat using chart 2 as a guide. Starting from round 1. Change to double point needles when the stitches are too tight for the circular needle.
Note: You can try it on and see if it’s slouchy enough for you. If not, then you can just keep on knitting. But keep in mind when begin forming a crown or decreasing you need to make sure the k2tog point is corresponding to the C1F. This is to keep the pattern in alignment.)
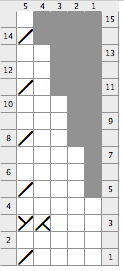 |
Pattern Chart 2: Decreasing A Crown Of A Hat Rnd 1: *K4, k2tog; rep from * to end of rnd. Rnd 2: Knit. Rnd 3: *K 3, C2F; rep from * to end of rnd. Rnd 4: Knit. Rnd 5: *K3, k2tog; rep from * to end of rnd. Rnd 6-7: Knit. Rnd 8: *K2, k2tog; rep from * to end of rnd. |
Rnd 9-10: Knit.
Rnd 11: *K1, k2tog; rep from * to end of rnd.
Rnd 12-13: Knit.
Rnd 14: *K2tog; rep to end of rnd.
Rnd 15: Knit.
Repeat Rnd 14 and 15 once more or until you have about 8 sts. left. Cut yarn about 10 inches away from the last st. Thread the yarn through a tapestry needle and run it through those sts a few time. Then weave the yarn to secure from the inside of the hat.
You can view and print this pattern in Google Doc at;
Helpful Knitting Videos For This Pattern
How To Cast On And Join Round With Circular Needle
Knitting A Crown Of a Hat With Double Pointed Needle When The Stitches Are Too Tight
Finishing Off A Crown Of A Hat Using Tapestry Needle
Go To Knitting Instruction Home Page
Go To Easy Knitting Pattern Page


Help Support me by purchasing these coloring books!


Recent Articles
-
Super Easy & Super Cute Child Hat Knitting Pattern
Nov 18, 25 02:47 PM
 Easy and cute to knit child hat knitting pattern. Make this hat using worsted weight yarn and 5.5mm needle. Choose yarn you like or suggested in the pattern!


New! Comments
Feel free to leave me a comments! I'd love to hear what you have to say. Thanks!