
School Vest With Fancy Cross & Cable Panel - Free Vest Knitting Pattern
Here is another vest I've made for my younger twin daughter. (The older one gets this boy and girl vest.) She was determine to have this Fancy Cross and cable panel patterns on both sides of her vest even though I told her it looks pretty big. Finally, we agreed on placing this pattern at the center of the vest. Enjoy!
|
Download Pattern size 25 - Right click on an image on your left and save. Download Pattern size 23 - Click Here Download Pattern size 21 - Click Here |
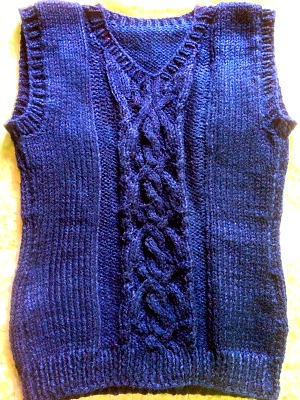
Image I: School vest in navy blue with Fancy cross and cable panel in the center front.
Description: School vest for girls chest size 21, 23 and 25 inches with hour glass body shape. The center of the front features Fancy cross and cable panel. To make this vest for boys, you can eliminate the body shaping. Just work straight up without decreasing or increasing the body shaping. The vest has a standard fit (not too loose and not to tight). The finished product will be slightly larger than its chest measurement.
Weight: medium /Ease: standard /Length: tunic
Skill level: intermediate – difficult
Gauge: 4 sts 6 rws per 1"
Chest Size: 25 inches
Materials
1. Approximately 374 yards of worsted weight yarn with the gauge indicated above
2. 16 inches-Circular knitting needle size 6 US (4mm)
3. Knitting needle size 8 US (5mm)
4. 5 mm Cable needle
5. 2 Stitch markers
6. Stitch holder
7. 2 row counters (one for the vest pattern and another for cable pattern)
8. Tapestry needle
Back of the school vest
With size 6 needle (4mm ) cast on 55 sts. Establish rib pat on Row 1: *K1 , P1. Repeat from *. End K1. Work 13 rws. On row 14, increase as below. [2"].
Rib-to-Body Increase Row
Increase 2 sts. as follows;
[p 18, inc 1 in next st, p 17, inc 1 in next st] 1x, p 18. (57 sts)
Work in stockinette st (k on right side, p on the wrong side) and at the same time follow body shaping as follows;
Begin shaping:
Decrease 1 st each side, every 14th row 2x. Increase 1 st each side, every 16th row 2x. (57 sts).
Continue until piece measure 13" [row 66].
Underarm Shaping:
Bind off 4 sts at beg of next 2 rows. Continue in pat st until piece measure 19.5" [row 106].
Bind off 13 shoulder sts. Bind off 23 back neck sts. Bind off 13 shoulder sts.
Front of the school vest:
Work k1, p1 ribbing and increasing row as for back ending with row 14.
Next row (Row 15, right side): With larger needles, k 13 sts, place marker, work center Fancy Cross And Cable Panel begin with 2nd row, place marker, k to end.
Work as for back, including all shaping, work cable panel pattern and at the same time when piece meas 15.5" [row 80] begin Neck Shaping below;
Work to center st, place center st on holder, attach another ball of yarn and complete row. Work both sides at once. Dec 1 st at each neck edge every row 7x, then every 2nd row 4x. Continue in pattern st until piece measure 19.5" [row 106].
With right sides together, sew side seams using tapestry needle and the same yarn. Seam 13 sts shoulder on each side. Weave in all ends.
Armhole Edging
With smaller size needle, pick up 60 sts around armhole edge. Work k1, p1 ribbing for about an inch. Bind off loosely.
Standard Neck Finishing
With smaller circular needle and with right side facing, pick up 23 sts from back neck, pick up 19 sts from left neck edge, place center marker, pick up center st from holder, pick up 19 sts from right neck edge, place end of round marker. (62 sts)
Rnd1: work in k1, p1 ribbing to within 2 sts of center marker, ssk, pm, k1, k2tog, work in k1, p1 ribbing to end of round.
Rnd2: work in established ribbing to within 2 sts of center marker, ssk, pm, k1, k2tog, work in establish ribbing to end of round. Repeat rnd 2 for approx. 1". Bind off loosely in ribbing.
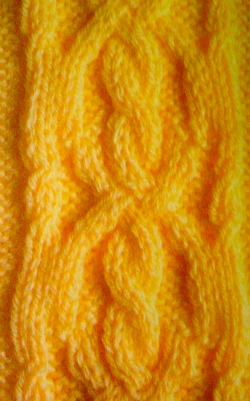
Fancy Cross And Cable Panel
Work over 30 sts in the center of the vest between the two markers.
1st row (wrong side): K3, [k2, p2] 3 times, [p2, k2] 3 times, k3.
2nd row: P5, C2R, p2, T4F, C4F, T4B, p2, C2R, p5.
3rd row: K5, p2, k4, p8, k4, p2, k5.
4th row: P5, k2, p4, [C4B]twice, p4, k2, p5.
5th row: As 3rd row.
6th row: P5, C2R, p2, T4B, C4F, T4F, p2, C2R, p5.
7th row: K3, [k2, p2] twice, k2, p4, [k2, p2] twice, k5.
8th row: P5, [k2, p2] twice, k4, p2, [k2, p2] twice, p3.
9th row: K5, [p4, k4] twice, p4, k5.
10th row: P5, [k4, p4] twice, k4, p5.
11th row: As 9th row.
12th row: P5, k4, p4, C4F, p4, k4, p5.
13th row: As 9th row.
14th row: As 10th row.
15th row: As 9th row.
16th row: P5, k2, T4F, p2, k4, p2, T4B, k2, P5.
Repeat these 16 rows
Important Knitting Terms & Abbreviations
M1 = make one or increase a st
rnd = round
pm = place marker
ssk
(slip, slip, knit) = slip next 2 sts knitwise and one at the time.
Insert left-hand needle through the front loop of sts just slipped.
Knit both sts at once.
C2R (Cross 2 right) = Slip the next
stitch onto cable needle and hold at back of work. Knit the next stitch
from left-hand needle, then knit st from cable needle.
C4F and
C4B (Cable 4 Front and Cable 4 Back) = Slip the next 2 stitches onto
cable needle and hold at front (or back) of work. Knit the next 2 sts
from left-hand needle, then knit sts from cable needle.
T4F
(Twist 4 Front) = Slip the next 2 sts onto cable needle and hold at
front of work. Purl the next 2 sts from left-hand needle, then knit sts
from cable needle.
T4B (Twist 4 Back) = Slip the next 2 sts onto
cable needle and hold at back of work. Knit the next 2 sts from
left-hand needle, then purl sts from cable needle.
* * End of Fancy Cross and Cable School Vest For Girls * *
Free Children Vest Knitting Pattern
Fancy Cross and Cable School Vest For Girls (chest size 25 inches)
By Ratchadawan Chambers from www.to-knit-knitting-stitches.com
copyright 2012 www.to-knit-knitting-stitches.com
|
Download Pattern size 25 - Right click on an image on your left and save. Download Pattern size 23 - Click Here Download Pattern size 21 - Click Here |
Leave Schoo Vest To Easy Knitting Pattern Page
Go To Knitting Instructions Home Page






New! Comments
Feel free to leave me a comments! I'd love to hear what you have to say. Thanks!