
Pretty In Red - Little Miss Claus Costume For Holidays and Parties
Although, this is not a beginner dress but with a little practice you can knit this.
Skills level: Intermediate
Description: Little miss Claus is a cute, close fit, below-knee dress with long sleeves for girls. It can be worn as a costume for a party, a halloween trick or treat and Christmas holiday. The neckline, hand cuffs and hemline are embellished with white fun fur. The dress is knitted in 4 pieces - front, back, and 2 sleeves.
My daughter designed this dress for her school holiday music last year. She always thinks mom can make her anything! And this is how it turned out.
|
|
Available Sizes: The pattern comes in 3 chest sizes - 21, 23 and 25 inches (The finished pieces will be slightly bigger than this measurement). I knitted the medium size for my girl when she was 6 yo. And it seems to fit her well. I used a sweater wizard software to help with the body sizes calculation. Gauge: 4.5 sts/inch on US # 8 (5mm) over the stockinette st. |
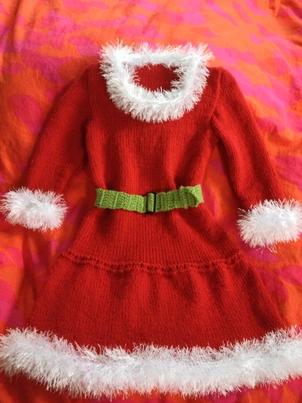
Image 1: Pretty in red holiday dress with a belt
Download Little Miss Claus in a PDF file HERE
Materials
- 4 balls of Lion brand wool ease (197 yds each) in red. I think I used about 3.5 balls for mine.
- 1 ball of Lion Brand Fun Fur in white.
- Circular knitting needle size US # 8 (5mm) It can be any where from 24-28 inches long.
- 16-20 inches Circular knitting needle size US # 10 (6mm).
- Tapestry needle
- Row counter
Optional Belt: I bought a little belt buckle from Joan and used left over green wool to crochet a belt. I did triple crochet throughout the pice and make a little loop to hold the end of the belt.
Direction
Back: With smaller needle, CO 50 (56, 61 )sts. Work back and forth in rows of Stockinette sts (knit on the right side and purl on the wrong side). Work until piece measures 10 (11, 11.5)inches from cast on.
Shape arm hole as follows;
Bind off 3 (3, 5) sts at the beginning of the next 2 rows. Decrease 1 sts on each side, every other rows 2 (3, 4) times. Work until piece measures 14.5 (16, 17) inches from cast on.
Shape shoulder
Bind off 2 (3, 2) sts at the beginning of the next 2 rows. Bind off 2 (3, 3) sts at the beginning of the next 2 rows. Bind off 3 (3, 3) sts at the beginning of the next 2 rows . Then bind off the last 26 (26, 27) sts (back neck).
Front
Work as for back including all shaping and at the same time when piece measures 12 (13, 14) inches begin neck shaping as follows;
Work to center 8 (8, 9) sts, attach another ball of yarn, bind off center 8, (8, 9) sts, Work to the end of row. Work both sides at once.
Bind off 2 sts at each neck edge 2 times. Decrease 1 sts at each neck edge, every other row 5 times. Continue in st st pattern until piece measures 14.5 (16, 17) inches from start.
Shape Shoulder
Shape shoulder (at shoulder edge) to correspond with back.
Sleeves
With small needle, cast on 32 (32, 34) sts. Knit 1 row (right side), then work in stockinette st (knit on the right side and purl on the wrong side), and at the same, increase 1 st on each side every 10th row 4 (0, 0) times, increase 1 st on each side every 4th row 0, (0, 1) time, increase 1 st on each side every 6th row 0 (7, 7) times. Continue in st st pattern until piece measures 7.5 (8, 8.5)inches.
Cap Shaping
Bind off 3 (3, 5) sts at the beginning of the next 2 rows. Decrease 1 st at each side every other row 2, (3, 4) times. Decrease 1 st each side every row 4 (8, 2) times. Decrease 1 st each side every 2nd row 5 (3, 6 ) times. Bind off 1 (1, 2) sts at the beg of the next 4 rows. Then bind off the remaining 8 sts.
Joining Pieces
With right side together, sew back and front pieces at shoulder and side seams using the same yarn.
Begin the bottom part of the dress as follows;
With smaller needle and with right side facing, pick up and knit along the bottom edge of the joined piece. Make sure to begin at the seam line. Join work in round and purl one round.
Next rnd: K1, *yo, k2; rep from * to last st, k1. If you have an extra st left over just knit it.
Next rnd: Purl.
Knit until you have about 2 inches less than your desired length. Then purl 1 row, knit 1 row and purl 1 row. Bind off knitwise.
Adding Fun Fur
With larger needle, pick up and knit fun fur along the cuffs, neck line and skirt hemline. Knit for and inch then bind off. Join in sleeve. Block piece if needed.
Note: Feel free to customize any length and parts according to your need.
You don’t need to pick up every stitch along the neck edge when adding fur. Skip some sts along the curves to make it snuggle. Use you judgement. Enjoy!
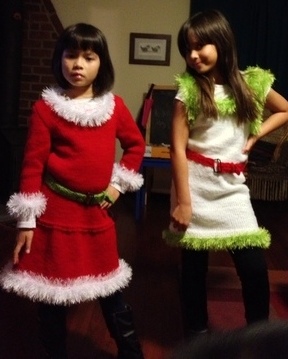
Image 2: Twin sisters dress up for school's holiday celebration at school
Leave Little Miss Claus To Easy Knitting Pattern Page
Go To Knitting Instructions Home Page


Help Support me by purchasing these coloring books!


Recent Articles
-
Super Easy & Super Cute Child Hat Knitting Pattern
Nov 18, 25 02:47 PM
 Easy and cute to knit child hat knitting pattern. Make this hat using worsted weight yarn and 5.5mm needle. Choose yarn you like or suggested in the pattern!


New! Comments
Feel free to leave me a comments! I'd love to hear what you have to say. Thanks!