
My First Felting Basket - Yes, You Can Felt Too!
Description: A felted basket made out of 100% wool. It is knitted using circular needles and double strains of yarns. The felting process was done by washing the piece in a hot water in a washing machine.
Finished Dimension: Diameter = 6.5 inches and Height = 3.75 inches
Skills Level: Easy
Here it is my first felted basket! Not so bad for the first try, isn't it? I've always wanted to felt but just didn't quite get to it. I am liking it. I can see how this can really get me hooked! Now, I want to felt everything.
Felting is really easier than I thought. The only extra step it takes beside knitting is to get the finished piece into a washing machine with a hot water. The hot water and long agitation make the wool shrink and thick.
I love the way my felted basket turned out. It is much more prettier than before it was felted. Even if you had made some mistake, no one will ever know because the piece will be all smooth and pretty. So, enough for the talk. Let's get started.

Image 1: A finished look of a felted basket using variegated pure wool
Here Is The Pattern For Felted Basket
Materials
1. 100 g of worsted weight wool (80% of wool or more).
2. 16-18 inches circular knitting needles size US #11 (8mm).
3. Tapestry needle.
Direction
Note: Use double strains of yarn throughout work. (Pull out the center end and combine it with the outer end to make double strains.)
CO 60 sts. Joint them in round and knit for 3 rnds. Purl 1 rnd. Knit until piece measures 6 inches from cast on. Then do decreases as follow;
1st rnd: *K 4, k2tog; rep from * to end.
2nd rnd: Knit.
3rd rnd: *K 3, k2tog; rep from * to end.
4th rnd: *K 2, k2tog; rep from * to end.
At this point the piece will become narrower and difficult to work in rounds. To save money from spending on an extra set of double pointed needles, I decided to work the rest of the pattern in rows as follow;
Row 1 (wrong side): *P2tog, p1; rep from * to end.
Row 2: *K2tog; rep from to end.
Row 3: *P2tog; rep from to end.
Row 4: (K2tog) twice, K1.
Row 5: P3tog.
Cut yarn leaving about 12 inches long tail. Bring the end through the last loop on the needle. Pull tight. Use tapestry needle and the end tail to sew side seams close (see pictures below). Weave all loose end behind work and trim off excesses.
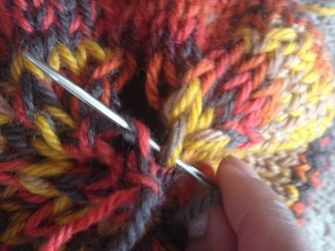
Image 2: Sewing end seams together
Wash the finished knitted piece in a washing machine with hot water and a tiny bit of soap if preferred. I washed my in extra small, regular cycle. At this point, I was very nervous and afraid I will ruin all the knitted work I’ve done.
After you’re done with the washing, take a look at the piece to see if you’re happy with the way it looks. Your piece should look slightly smaller, tighter and fuzzier than it was before the wash. If you don’t want the fuzzy look, you can throw it in a dryer for a few minutes to achieve a smoother finish.
I’m not an expert on felting and could use some more practice. Your finished result may look different than mine. No matter how it turns out, I think it' ll still be fun. I hope you give felting a try. Thanks for visiting!
I found these comment to be very helpful so I'd like to share it with you.
"The only thing I would add is to make sure to felt your project inside a zippered, fine mesh bag or pillow case. The fuz from the yarn during the felting process can clog your lines, or worse, ruin the water pump in your machine. Thanks for the pattern!!"
"The secret to felting is to get as much air out of the yarn as possible. I always put my item in a zippered pillow protector case to keep the "yucky" yarn residue out of my machine. I also throw in a pair of sneakers - gets my shoes clean and allows for a snugger felt by beating the air out of the yarn. Great project! Thanks for sharing."
"I made nine felted baskets in no time and loved how they turned out. While they were still wet from the washer, I took them to my local grocery store florist. I bought plastic liners (about 59 cents each) for each of them to make them more versatile. Drying them with the liners inside helped shape them. Some I tugged upward to make them a little taller than the liner. Now they can also be used as a planter, candy dish, relish bowl, etc."
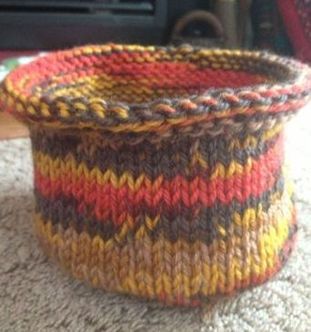
Image 3: A finished knitted basket before going into a washing machine.
Leave Felted Basket To Knitting Instructions Home Page
Go To Easy Knitting Pattern Page


Help Support me by purchasing these coloring books!


Recent Articles
-
Super Easy & Super Cute Child Hat Knitting Pattern
Nov 18, 25 02:47 PM
 Easy and cute to knit child hat knitting pattern. Make this hat using worsted weight yarn and 5.5mm needle. Choose yarn you like or suggested in the pattern!


New! Comments
Feel free to leave me a comments! I'd love to hear what you have to say. Thanks!