Crossing Leave Neck Warmer
A Cozy Little Scarf For Anyone!
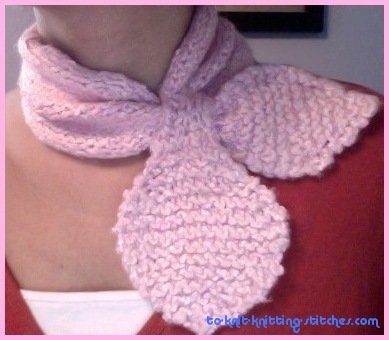
I knitted this neck scarf out of my imagination and didn’t have any written pattern. I wrote the pattern after I finished the piece. I call this mini scarf “crossing leaves” because it has 2 leaves crossing over each other at the front. The leaves are knitted in garter stitch and the body of the scarf (neck warmer or neck cozy) is knitted in stockinette stitch. The pattern looks pretty long because I wrote it in a very detail description. It’s easy enough for beginners, I think. You can adjust the length to fit your need. I knitted this neck warmer for my five years-old daughter, that’s why it looks a little tight on my neck in the picture shown below.

Crossing Leaves Neck Warmer by Ratchadawan Chambers
This pattern is available in PDF format. Click Here to download.
Skill Level: Easy to intermediate.
Gauge: 3.5 sts. per inch on US #10 (6mm) needle
Finished Measurement: Width 6 inches at the of body part, height = 23 inches long.(can be made longer if preferred)
Materials:
- 1 skien of Bernat Bamboo Chunky Natural Blends Yarn
or chunky yarn of your choice.
- Knitting needle US #10 (6mm)
- Stitch Holders
Direction for the neck warmer
Making the first leave.
Make a slipknot (a loop)
Row 1: K into front and back of a stitch, I will refer to this as "M1" or "Make 1".
Row 2: M1, k 1. (3 sts total)
Row 3 and other alternate row: Knit.
Row 4: M1, k1, M1. (5 sts total)
Row 6: M1, k 3, M1. (7sts total)
Row 8: M1, k 5, M1. (9 sts total)
Row 10: M1, k7, M1. (11 sts total)
Row 12: M1, K 9, M1. (13 sts total)
Row 14: M1, K 11, M 1. (15 sts total)
Row 16 to 17: Knit.
Row 18 (Decreasing row): K2tog, K to last 2 sts, k2tog. (13 sts total)
Row 19 and other alternative rows: Knit.
Row 20: As row 18. (11 sts total)
Row 22: As row 18. (9 sts total)
Row 24: As row 18. (7 sts total)
Row 25 (ribbing): *K1, p1; repeat from* to the end.
Row 26: *P1, k1; repeat from * to the end.
Repeat row 25 and 26 two more times.
Make 1 to all of the stitches. You will have a total of 14 stitches.
Knit 1 row. *K1, M1, repeat from * to the end. (total of 21 sts.) Continue working in Stockinette stitch (k 1 row, p 1 row) for another 12 and 1/2 inches or as desired length, ending with the purl row. Then do decrease row as follow;
*K1, k2tog, repeat from * to the end. You now have 14 stitches.
P 1 row.
Next row (forming a ring): *K1, slip the next stitch onto a stitch holder, p1, slip the next stitch onto the stitch holder ; repeat from * to the end. There should be 7 sts on the holder and 7 sts on the needle. Continue working on the needle in ribbing as follow;
Row 1: *P1, k1; repeat from * to the end.
Row 2: *K1, p1; repeat from * to the end.
Repeat these two rows one more time. Then do row 1, one more time.
Cut off yarn leaving 6 inches tail. Place these stitches on stitch holder. Turn the work over to the wrong side. Transfer stitches on the 1st stitch holder onto the knitting needle and work ribbing as follow;
Row 1: *K1, p1; repeat from * to the end.
Row 2: *P1, k1; repeat from * to the end.
Repeat these 2 rows two more times.
Next row (joining ribbing pieces together to form a ring): Knit the first stitches and the following stitches on the needle and the holder together. (If this is too confusing for you, you can try this method: Slip the first stitch off the left needle, knit the first stitches from the stitch holder and slip the slip stitch over the stitch just knitted) Now you should have 7 sts on the needle. K 1 row. Do the second leave as follow.
Row 1: M1, k to last stitches, M1.
Row 2: Knit.
Repeat row 1 and 2 until there are 15 stitches all together. K 2 rows.
Next row (decreasing): K2tog, K to the last 2 sts, K2tog. (13 sts total)
Next row: Knit.
Continue decreasing as the above 2 rows until there are 3 sts left.
Next row: Slip 1, k2tog, pass over. K 1. Cut off yarn leaving 6 inches tail. Weave all the loose ends of the yarn at the back of work and block the piece if preferred.
You now have completed a “Crossing Leaves Neck Warmer or A Mini Neck Cozy”, Congratulation!
Now it’s time to Share Your Photo Here.
Click Here to download this pattern in PDF.
Leave Neck Warmer to Easy Knitting Pattern
Return to Knitting Instructions Home Page


New! Comments
Feel free to leave me a comments! I'd love to hear what you have to say. Thanks!